Home » Home Improvement
Category Archives: Home Improvement
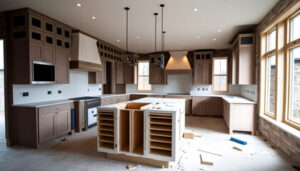
Cabinet Refinishing – Give Your Kitchen Cabinets a Classic Makeover
Cabinet Refinishing Modesto Anchor is a cost-friendly way to give your kitchen cabinets an update without springing for a full refacing project. A fresh coat of paint can cover stains, scratches, and dings.

A high-quality sealant helps protect your finish from moisture, preventing premature wear. It also protects your finish from fading and keeps it looking its best.
Cabinets are usually painted with enamel paints for long-lasting results. These durable finishes come in a wide range of colors to match any home decor scheme. They also resist moisture better than other options like latex paints. To ensure the best finish, it’s important to follow a few key painting steps. First, it’s necessary to prepare the surface of your cabinets for paint by using a degreaser. This will remove any grease or dirt build-up, which is essential for a good coating of paint. It’s best to use a spray on degreaser, or if that isn’t effective, a strong cleaner such as trisodium phosphate (TSP) mixed with water. Always remember to wear gloves and open windows for proper ventilation during cleaning.
Once your cabinets are clean and ready for paint, it’s time to prime them. A good quality primer will provide a solid base for your top coats and prevent staining. It’s best to use an oil-based primer for better adhesion, but it’s also possible to get good results with a latex-based product as well.
Before you start painting, make sure to set up a workspace away from the rest of your home. This will prevent any accidental spills or smudges. Also, if you’re working with cabinets that have hinges, it’s a good idea to remove them and place them in a safe place where they won’t be accidentally knocked into during the painting process.
Lastly, it’s always a good idea to sand the surfaces before painting. This will help the new finish to adhere properly, and it’s a necessary step before applying any glaze. To sand the cabinets, you can use either a sanding sponge or a random orbital sander. It’s a good idea to use medium or 180-grit sandpaper. After sanding, be sure to vac and wipe down the surfaces to remove any dust.
When painting, it’s a good idea to use a high-quality brush or sprayer for a smooth, even coat of paint. It’s also important to allow the paint to dry completely before moving on. It’s a good idea to wait about 24 hours for the paint to fully cure.
Staining
Cabinet staining can give the wood cabinets in your kitchen an updated look that’s both classic and contemporary. Staining allows the unique characteristics of the wood to shine through, and it’s an easy way to create a dramatic aesthetic. Unlike painting, staining leaves the structure of your cabinets intact.
The cabinet staining process involves sanding the wood to smoothness, applying the desired color of stain, and then sealing it for protection and longevity. This is a more involved process than painting, but it’s still a relatively budget-friendly option for changing the overall appearance of your kitchen.
Before staining, you’ll want to prep your work area. Mix trisodium phosphate (TSP) or another deep cleaner with degreasing properties in warm water, then dip a clean rag into the mixture and wipe down the surfaces you’ll be working on. This removes any remaining oil or grease on the surface, ensuring the new finish will adhere. You should also sand any textured or molded areas to ensure a consistent look. It’s not required to sand before staining, but it helps the new finish adhere better and look better.
Using a brush, sponge, or cloth, apply the stain to the cabinet doors and drawer fronts, being careful not to over-apply the product. Be sure to apply the stain evenly and follow the direction of the grain. Depending on the desired effect, additional coats of stain may be necessary to achieve your preferred look. After each coat, wait for the stain to dry completely before re-applying.
When finished, apply a clear sealant to protect the finish and make cleaning easier in the future. It’s important to follow the manufacturer’s instructions and apply a minimum of two coats. It’s also important to use a high-quality sealant that is designed for staining.
Unlike painting, staining leaves the structural integrity of your cabinets intact, making it an ideal choice for those who are looking to add a more traditional or rustic feel to their kitchen. However, it’s not a good option for those who have laminate or thermofoil cabinets because they can’t be sanded and stripped like wood can.
Repairing
A fresh coat of paint or glaze can make a dramatic difference on cabinet doors, and is a cost-effective alternative to replacing them. It’s important to clean your cabinets prior to applying a new coat of paint or glaze, so that they are free from dirt and grease. Also, be sure to use gentle cleaning products. Over time, harsh chemicals can strip the protective coating of wood surfaces, making them vulnerable to damage and chipping.
Cabinet refinishing is an excellent option if your cabinet boxes are in good condition, but you want to change the color of your cabinet doors and drawer fronts. This process involves stripping the existing finish, repairing any damages, and then staining or painting the cabinet boxes and doors to give them a new look. This is an ideal solution for older, well-built wooden cabinets, as well as those made from engineered wood or medium-density fiberboard (MDF).
While refinishing can create an elegant look in your kitchen, it’s not a long-term solution. Even the highest-quality refinishing job will show signs of wear and tear after a few years. Chipping around handles, fading of colors, and exposed edges are common signs that it’s time for a refresh.
Refacing is a more extensive project than refinishing, and it requires the removal of all components inside your cabinets, including hardware and hinges. This allows you to change out the door and drawer fronts, as well as add molding to the corners of your cabinets. It is an excellent choice for reworking your existing layout or adding extra storage to your kitchen. Popular reconfigurations include moving upper cabinet doors to the ceiling, removing the bottom cabinets altogether and turning them into open shelving, or rehanging the uppers to create more display space. This isn’t a viable option for laminate or thermofoil cabinetry, as these materials cannot be sanded down or chemically stripped. If your cabinetry is damaged beyond repair, refacing may be the only option. A professional will be able to help you determine which option is best for your kitchen. They’ll take into account your desired budget, timeline, and aesthetic, as well as the structural integrity of your cabinets.
Reassembling
Cabinet refinishing is an important part of any kitchen renovation. It is a transformative process that combines creativity and functionality to craft a new narrative for your kitchen. It involves stripping the existing cabinets, repairing any damage, and applying new paint or stain. It is a great way to refresh your kitchen without spending a lot of money. The color options are virtually limitless, from a bold statement shade to a timeless neutral. A professional can provide you with sample swatches and examples to help you choose the right shade.
It is important to use a high-quality sealant to protect the newly applied finish from moisture and wear. This will prolong the life of your cabinet refinishing and prevent the surface from peeling or cracking. Always apply the sealant in a well-ventilated area and follow all manufacturer’s instructions.
Refinishing your cabinets is a good choice if you’re looking for a dramatic change but don’t want to spend the money on a complete replacement. It is also a good option if you have minor wear on your existing doors and drawer fronts but want to improve their appearance.
Before you start refinishing your cabinets, it is important to clean them thoroughly with a mild cleanser. This will remove any dirt and dust that has accumulated over time. Make sure to clean the hinges and handles before applying any finish. It is a good idea to wear protective gear when working with chemical solvents or sandpaper. It is also a good idea to use a mask when sanding and painting.
The cost of refinishing your cabinets is less than replacing them, and you can usually get the job done in one day. However, refinishing does not offer the same degree of visual change as refacing or replacing them.
Choosing the right type of cabinets is an essential step in any kitchen remodel. Consider the style, durability, and cost of each option before making a decision. Assembled cabinets are a more affordable option than custom cabinetry, but they may not be as durable. They may also require more maintenance, including sanding and sealing, than custom cabinets.
Kitchen Remodeling Leads to Better Meals
A functional kitchen makes meal prep a pleasure rather than a chore, promoting healthy eating habits. Convenient additions like pull-out shelves make it easier to store and access ingredients.
A remodeled kitchen also adds value to your home, especially if you plan to sell later on. Potential homebuyers often prioritize homes with modernized kitchens. Keep reading the article below to learn more about Kitchen Remodeling Leads.
Remodeling your kitchen gives you the opportunity to create a space that meets your family’s needs and reflects your personal style. Whether you prefer modern and sleek or warm and rustic, there are a variety of options available to suit your tastes. You can also incorporate custom features, like a kitchen island with pendant lighting, to add visual interest to your kitchen. Moreover, newer appliances offer improved energy and water efficiency, which reduces your utility bills and carbon footprint.
A kitchen renovation can increase the resale value of your home. Prospective homeowners often prioritize properties with updated kitchens, and you can recoup most or all of the remodeling costs when it comes time to sell. However, it is important to work with experienced professionals so that the finished product reflects the quality and value of your home.
Sustainable Kitchen Remodeling Leads
Many homeowners are becoming more environmentally conscious and prefer to remodel their homes with eco-friendly materials. While these solutions can be more expensive than traditional materials, they have long-term benefits such as reduced energy and water consumption. From replacing old appliances with more efficient models to insulating inner cabinet walls with organic wool insulation, there are many simple solutions that can be implemented during kitchen remodels to make your home more eco-friendly.
Social Media Marketing
Maintaining an active social media presence is an effective way to generate leads for your business and establish your brand as a leader in the field of kitchen remodeling. Posting high-quality before-and-after photos of your previous projects, testimonials from satisfied customers, and kitchen design tips can help you attract and retain customers. Additionally, a Google Business Listing that is linked to your website can serve as a useful bridge for potential clients seeking detailed information about your services.
Optimizing your website is another effective way to generate Kitchen Remodeling Leads. Researching relevant keywords and using them strategically in your page titles, meta-descriptions, headers, and body text can boost your visibility in searches by prospective homeowners. Furthermore, offering tools like an estimate calculator on your website can enhance user experience and serve as an effective lead generation tool.
Enhanced Aesthetics
The kitchen is the heart of every home, a space where families gather to enjoy meals and share memories. Over time, however, even the most cherished culinary spaces can begin to feel outdated or out of date. A kitchen remodel is an opportunity to breathe new life into this cherished space, transforming it into one that perfectly fits your lifestyle and aesthetic preferences.
A remodel can be as simple or as comprehensive as you desire, ranging from basic upgrades to a complete overhaul of the layout and design. A major renovation will often involve substantial structural changes, while a simple upgrade may only require superficial surface replacements or repairs.
While a custom kitchen remodel can cost significantly more than a standard update, it also adds significant value to your home. Prospective homebuyers prioritize homes with updated kitchens, and you can usually expect to recoup most or all of your investment when the time comes to sell.
Kitchen remodeling can also include convenient features that make cooking and entertaining easier. For example, if you have young children, adding a low counter space where they can help with meal prep can make dining together more enjoyable for the whole family. For older adults, incorporating accessible features into the design can ensure that your kitchen will serve you well as you age.
Investing in high-quality kitchen remodel leads is an effective way to grow your business and attract more qualified customers. With the right marketing strategies, you can build trust and demonstrate your expertise in kitchen remodeling while positioning yourself as a go-to service provider in the niche. Start by optimizing your website with targeted kitchen remodeling keywords that potential clients are likely to search for, ensuring that you’re visible in the digital landscape. You can then direct these potential clients to valuable content, like your portfolio of kitchen remodel projects or contact form, to build trust and convert them into paying customers. You can also link your website to your Google Business Listing, which can help improve local visibility and generate traffic and leads for your business.
Better Nutrition
Cooking in a cramped space or with outdated appliances can be a hassle, but a kitchen remodel makes meal prep easier. Custom cabinets, pull-out shelves, and improved storage help keep cooking and entertaining spaces organized and accessible. Additionally, a new layout can make the most of work triangles, allowing homeowners to efficiently use their stove, sink, and refrigerator.
Using social media and a dedicated website are effective tools for generating Kitchen Remodeling Leads. Regular posts, like before-and-after photos of kitchen remodeling projects and customer testimonials, increase visibility and engagement with potential clients. Additionally, providing resources, such as EcoHome’s estimate calculator, add value to site visitors and encourage them to reach out for a consultation.
Adaptable Space
An updated kitchen is a significant investment, but it can add considerable value to the home. Prospective homeowners will prioritize homes with modernized kitchens. A kitchen remodeling project is a great opportunity to consider the family’s lifestyle and design the perfect space for cooking, entertaining, and relaxing. Incorporating features that allow for customization, such as adjustable shelving and pull-out drawers, can make the kitchen more accessible. If you have young children, for example, installing a low counter where they can assist with food prep is a practical choice. Similarly, for individuals planning to age in place, designing a kitchen with accessibility features is crucial.
The most important aspect of a successful kitchen remodel is determining the right layout. Assessing the kitchen’s dimensions and traffic flow can help ensure that pathways are clear and spacious, making it easy to move around. Taking into consideration cooking and entertaining habits can also aid in the decision to opt for an open or closed kitchen. Incorporating custom cabinets and maximizing storage space can also help keep the kitchen clean and organized, which is an important factor in maintaining a functional space.
Adding unique features to the kitchen can make it feel more personal and welcoming, which is especially appealing to potential homebuyers. Incorporating trendy materials and trends is a great way to update the kitchen with contemporary aesthetics. Including a dining area or island can add seating and extra workspace, while adding pendant lights over the island can create an elegant focal point.
The kitchen is a central gathering spot for family and friends, so it should be comfortable and inviting. Choosing a color scheme that reflects the homeowner’s taste can add warmth and character to the kitchen. Creating an inviting atmosphere through the use of unique lighting fixtures and statement appliances can transform the space into a showpiece.
Generate high-quality Kitchen Remodeling Leads that are ready to convert to paying clients using effective online marketing strategies. Investing in content such as blog series, downloadable guides, and social media promotions can help increase brand awareness and establish your business as an expert. You can also promote customer referral programs to encourage current clients to spread the word about their positive experiences.
The Backbone of a Bathroom Remodel
Bathroom Remodel Thousand Oaks is a great way to add value to your home. It is also a fantastic opportunity to make your bathroom safer for anyone who uses it. Safety features like grab bars, hand-free faucets and walk-in showers can be incorporated during this project.
It is important to understand the difference between a remodel and renovation. A renovation involves changing fixtures, repainting walls and flooring but doesn’t involve any major changes to the space.
A bathroom remodel is all about changing the look and feel of a space, but it also involves some layout changes. For a truly functional design, it’s important to take into account how you use the room and what features are most important to you.
For example, you may want a relaxing tub or a spacious shower. You might also want a double vanity or plenty of storage. It’s a good idea to make a list of “must-have” and “nice-to-have” features before you start your remodeling project, so you know what to expect when it comes time to start drafting your plan.
In general, the more floor space you have to work with, the more design options you’ll have at your disposal. For instance, a bathtub and shower can be placed on opposite walls to allow for more open floor space. This is a great option for homes that require more than one bathroom user at a time.
Another option is to place a shower over a soaking tub. This can free up more space for other amenities, such as a linen closet or a tall storage cabinet. It also allows for a spacious walk-in shower, which is often preferred by homeowners looking to get up and go quickly in the morning.
This type of layout isn’t suitable for all bathrooms, as it requires a bit more plumbing work and will leave less room for other fixtures like a toilet and towel bar. However, it can be a great solution for tight spaces or for those who are short on budget and need to make the most of their space. It can also be a practical solution for older homes that already have an existing soaking tub, as they can simply convert it to a modern shower.
Plumbing
When it comes to remodeling your bathroom, you’ll want to think about the plumbing and electrical work involved. This may include moving or replacing pipes, adding a new fixture like a toilet, tub, shower, or sink, or relocating the existing fixtures. This part of the project can be expensive and time consuming.
If you need to make plumbing upgrades, it’s best to consult with a professional plumber before starting your NYC bathroom renovation. This way, you’ll know what to expect and can plan accordingly. A full remodel will also require demolition, which will take longer than a renovation and can be more expensive.
A replacement remodel is less expensive than a full renovation and involves replacing the existing components with new ones. This can be as simple as installing a new toilet or bathtub where the old one is, or it can be more extensive such as converting a tub to a walk-in shower.
Renovating your bathroom or undergoing a complete gut renovation can increase the value of your home and improve your quality of life. The most important aspect of any remodel is planning, however, as mistakes can be costly. Be sure to set a budget and stick to it. A good rule of thumb is to have about 5-10% of your budget available for unforeseen expenses.
A bathroom remodel is an investment, but it’s worth it in the long run. By following these tips, you can create the beautiful bathroom you’ve always wanted without spending more than you can afford. Contact Teague Electrical for help with your next project. We’ll be happy to discuss the specifics of your needs and help you choose the right options for your circumstances.
Electrical
Plumbing and electrical work are the backbone of any bathroom remodel. They are vital to the functionality and safety of any bathroom, and it is important to make sure they are up to code before proceeding with a remodel. The plumbing and electrical work involved in a remodel is often more complicated than simply changing fixtures or repainting. It requires careful attention to detail and knowledge of local building codes and permits.
One important consideration for electrical work during a bathroom remodel is the placement of outlets and switches. It is important to position them away from any water sources, such as sinks, bathtubs and showers. This will help prevent potential hazards and reduce the risk of electric shock. It is also essential to ensure that any new circuits are properly sized, so they don’t cause breakers to trip or damage wiring.
Another critical aspect of electrical work during a bathroom remodel is installing new lighting fixtures. There are a wide variety of lights available for bathrooms, and it is important to choose ones that are rated for use in wet locations. Lighting can have a huge impact on the overall look of a bathroom, and it is worth the investment to hire a licensed electrician to install any new lighting fixtures.
If you are upgrading your bathroom, it is a good idea to add more storage space for towels, soap, toilet paper and other supplies. This will increase the functionality of your bathroom and may also boost its resale value.
Before beginning any remodeling project, it is important to consider the impact on your budget. There are a number of factors that can affect the cost of a remodel, including:
Materials
When it comes to bathroom materials, your choices will impact not only the aesthetic of your new space but also its durability and maintenance needs. These factors will have a direct impact on the overall cost of your remodel.
To avoid overspending on materials, it is important to understand the price of your desired materials and compare them with alternative options. Basic tile, for example, offers an inexpensive option that is easy to maintain and resistant to mold and mildew. However, natural stone provides a luxurious look that is more durable but can be very expensive. Alternatives like quartz and patterned tile offer similar design options but at a much lower cost.
Additionally, it is crucial to consider your long-term goals for the space. For example, if you plan to sell your home in the future, it is important to choose materials that are timeless and will not go out of style in the near future. Additionally, incorporating energy-efficient appliances and fixtures will help reduce utility costs.
The right materials can dramatically affect the appearance of your new space and set the tone for the entire room. For example, shiplap walls or beadboard can create a cozy and rustic feel while glass and quartz provide modern appeal.
It is also important to choose durable and water-resistant materials for your vanity countertops and flooring. This is because bathrooms are high-traffic areas that can experience extreme humidity and temperature changes. Additionally, many materials are susceptible to damage from scratching, stains and chipping. Durable materials like porcelain and ceramic are low maintenance but can become discolored with repeated use. Quartz, on the other hand, resists scratches and stains and can be easily repaired with a bit of polishing.
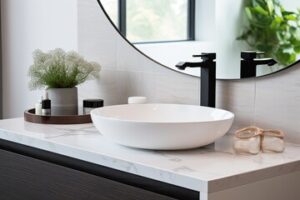
Finishes
While the design and functionality of your bathroom are most important, the finishing details can make all the difference. From the smallest components to major fixtures, a well-chosen finish can bring your renovation to life and tell a story that resonates with your family’s aesthetic.
If you’re seeking an elegant, refined look, brushed nickel is a popular choice. It offers the same lustrous sheen as chrome but with a soft, subtle appearance that hides water spots and fingerprints better. It’s also durable and versatile, fitting seamlessly into a variety of decor themes – from contemporary to rustic farmhouse.
For those who are interested in a warmer touch, brass finishes are making a comeback this year. From antique to polished, these warm tones provide a sophisticated style and feel especially at home in traditional or farmhouse bathrooms. However, they’re less forgiving when it comes to stains and fingerprints and may require more maintenance than other finishes.
Brushed bronze and champagne bronze offer a chic twist on the classic gold tones that are so popular in modern design. These subdued hues provide a rich, neutral appearance that fits in with any color palette and design style, from rustic farmhouse to transitional contemporary.
Polished stainless is another popular option that brings a sleek, sophisticated sheen to showers and bathrooms. This clean, classic finish is versatile and easily integrates with a wide range of styles and colors, blending seamlessly into both contemporary and traditional bathroom designs.
It’s also worth noting that any finishes will change over time, as they’re subject to constant exposure to natural oils and moisture from daily use. To ensure that your bathroom’s fixtures continue to look great over the long term, it’s best to wipe down all surfaces and hardware regularly with a designated hand towel or microfiber cloth.
Refinishing Your Floors
Hardwood floor refinishing is a cosmetic procedure that involves sanding the surface and applying a new finish coat. This is less invasive than resurfacing and removing the existing flooring materials.
Clear the work area and use plastic tarps to cover doorways and vent ducts to keep sanding dust from spreading throughout your home. Solid hardwood can typically be refinished up to five or six times before needing replacement.

Sanding is the most laborious and time consuming part of any floor refinishing project. It’s also a necessary step to smooth and flatten the surface for staining and refinishing. It’s best done with a walk-behind sander, like a drum floor sander, to get the big areas covered quickly. A smaller hand sander is also useful for the nooks and crannies that the larger machine can’t reach. Before sanding, the floor should be thoroughly cleaned and swept or vacuumed to remove loose dirt and dust. A light mopping with a slightly damp cloth may also help to soften the dust. It’s also a good idea to examine the floor for protruding nails that need to be hammered down or otherwise removed before you start sanding. Protruding nails can clog the sanding belt or pad and leave ugly marks in the floor.
When sanding, it’s important to follow the grain of the wood. Doing so produces a smoother finish and it’s less likely to cause unsightly scratches in the finished product. The floor should be sanded with the grain at least twice, starting with a coarse 36 or 40-grit paper and then moving to finer 80, 100 and 120-grit papers as needed. Always sweep or vacuum in between each grit change to clear away residue from the rougher abrasive that could scratch the floor later.
While the large area of the floor is being sanded, use the edger to sand the edges and corners. It’s a common mistake to overlook these areas, and they can create a jarring contrast with the main expanse of the floor. It’s also a good idea, once the floor is sanded to the proper consistency, to do a final pass with a 120-grit paper to blend the straight sanding cut of the drum sander with the circular sanding cut of the edger.
While sanding, it’s essential to wear appropriate protective equipment. A respirator or face mask is recommended to prevent inhalation of the abrasive dust produced by these machines. Eye protection is also a must, as the dust can cause irritation. It’s a good idea to wear gloves as well to protect against splinters.
Staining a wood floor is a rewarding DIY project that can transform the appearance of your entire home. To make sure that your staining project goes smoothly, it is important to plan ahead and take your time. Be sure to test your stain in an inconspicuous area before applying it to the whole floor, and follow the instructions for your specific type of stain to ensure that you achieve a beautiful and even result. You can also consider water popping the floor before staining it to help prevent blotching and to make the color appear darker.
There are two main types of stain for wood floors – dyes and pigments. Dye stains are transparent and soak into the surface of the wood to change its color. Pigments on the other hand act more like paint and obscure the grain of the wood. Pigment stains can be oil or water-based, and are available in almost unlimited colors.
To decide which kind of stain you need to choose, first consider the colors you would like your floor to have. A good tip is to use a color wheel to help you select the best colors for your particular floor. After you have decided on the colour, you should test it out on a scrap piece of wood or your baseboards to ensure that it will look perfect when applied to the floor.
The next step is to prepare the floor for staining by vacuuming up any dust left behind, and cleaning with mineral spirits. The room must be well ventilated since this step involves using oil-based solvents, which can produce harmful vapors. Once the floor is prepared, begin staining in sections that are long and wide enough to allow you to work without having to walk on the stained area.
When applying the stain, be sure to apply it evenly with a lambswool applicator. If you have a lot of different colors of stain, mix them together before you start so that they will come out consistent and even on your floor. If you are doing more than one coat, wait for the first one to dry completely before you apply the second coat.
Staining the floor can change its color and give it an updated look. It can also help protect the wood and prevent it from being damaged by moisture and other environmental factors. It is important to apply the stain as soon as possible after sanding. Bare wood quickly weathers, and moisture can easily penetrate the surface. This can cause the grain to raise, and it will cause the stain to become blotchy.
Before applying the stain, you should make sure there is proper ventilation and that you are wearing a mask to avoid inhaling any fumes. You should also test the stain in an inconspicuous area to ensure it is what you want. This will allow you to see how it looks and adjust the color if necessary. After testing the stain, you can begin working on the rest of the floor. It is best to work in small sections at a time.
If you want to enhance the appearance of your floors, consider using a water-based stain. This type of stain dries quickly and is less likely to leave residue on the surface. Water-based stains are also environmentally friendly and contain fewer VOCs than traditional oil-based stains.
When applying the stain, you should follow the manufacturer’s instructions for coverage and drying times. It is also important to wipe away any excess stain within five minutes of application. This will help prevent blotching.
Once the stain has dried, you can apply a polyurethane finish to protect the floor. You can use a high-quality brush or roller to apply the finish, and most floors will benefit from two or three coats of finish. The finish can be glossy or semi-glossy, depending on your preferences. Once the final coat of finish has dried, you can move your furniture back into the room and enjoy your newly-refinished floors.
Refinishing your floors can add value to your home and enhance the beauty of your property. If you are considering refinishing your floors, be sure to contact a reputable professional to get the job done right. It is worth the investment to ensure your floors last for years to come.
Hardwood flooring is a timeless choice for home decor, and it can also increase the value of your house. Refinishing your wood floors every so often will keep them looking their best and prevent future damage. A good floor finish will seal the pores and protect against water, stains, scratches and dirt.
A variety of finishes are available for your hardwood floors, including polyurethanes, lacquers and oils. Choose a finish that provides the look you want and meets your budget. Lacquers provide a smooth, glossy finish and are available in different colors to enhance your decor. Oils create a more natural-looking finish that is slightly rough to the touch.
After you sand your wood floors, you need to protect the newly finished surface and furniture from dust, dirt and grit. Cover your walls and furniture with plastic sheeting and tape to contain the dust. You should also remove baseboards and nailheads from the wall. This will make it easier to reinstall them later when the floor is complete.
If the original finish on your wood floor was wax, you will need to remove all traces of it before you can apply the new finish. Start by rubbing the whole floor with 180-grit sandpaper, then hand-sand the corners and other nooks that the buffer can’t reach. When you’re done, the floor should be wiped down with a terry-cloth mop and a solution of 10 parts water to 1 part white vinegar.
Today’s most popular wood floor finish is a polyurethane. It adds thick layers of protective, stain-resistant coating that help your floors last a long time. It’s available in both oil-based and water-based varieties, with the latter having the reputation of being eco-friendly. Water-based varieties dry clear, while oil-based have a slight amber tint.
Another popular choice is a shellac finish. Its organic composition includes beeswax, carnuba and linseed oil and sometimes contains other natural ingredients. It can be applied in multiple thin coats, and buffed with steel wool, pumice or rotten stone to achieve a very high-gloss sheen. It’s slow to dry, but it is a durable and beautiful choice for your floors.